Build a simple Apple Watch App in Swift.
Now a days, Most of iOS developers are developing watch App. Today I am also writing tutorial of How to develop simple watch App. WatchKit SDK allows developer to create apps for Apple Watch.

This tutorial useful to learn how to create simple table in Watch App, layout the app UI and how to run Watch App.
Follow simple steps to develop Watch App.
Step 1 : Open the Xcode , Select create new project and After selecting, enter the product name as "ListyWatch". Organization name "GuruSoft" and Organization identifier "com.gurusoft", Then press the next and create the new project.

Step 2 : Select the location to save project on hard drive.

Note : Here you have just created simple iOS(iPhone) application, We are not going to show anything on iPhone (simulator).
Step 3 : Now go to Xcode > File > New > Target. (As shown in below image.)

Step 4 : Select "Application" in "WatchOS" section. Then click on WatchKit app. and press Next button.

Step 5 : Give the name of your watch App "MyListly", also uncheck three checkbox if Checked. because we are not going for this now.
1. Include Notification scene.
2. Include Glance scene.
3. Include complication.

Step 6 : Now you have successfully added "Watch Kit app" and "Watch Kit Extension" to your project. Here you can see two new Groups were created in File inspector. Named "MyListly" and "MyListly Extension". There are also two new targets added with main iPhone app.
In WatchKit App, You have three files. In those one is Interface.storyboard which is helpful to design and navigation flow for different watches (There are two sizes of watch : 38mm and 42mm).
 Note : Both new target's bundle identifiers are always start with Main iPhone app's bundle identifier. Please do not edit it manually. if you are going to edit/change later please check the name in every *.plist file and also *.entitlements file (if you have added any new capabilities)

Step 8 : In Interface.storyboard select the controller. How to create new controller and assign a new class from the Xcode. To create new InterfaceController Drag and Drop Interface Controller from Object library.
 Step 9 : You can set title for controller to show on watch.

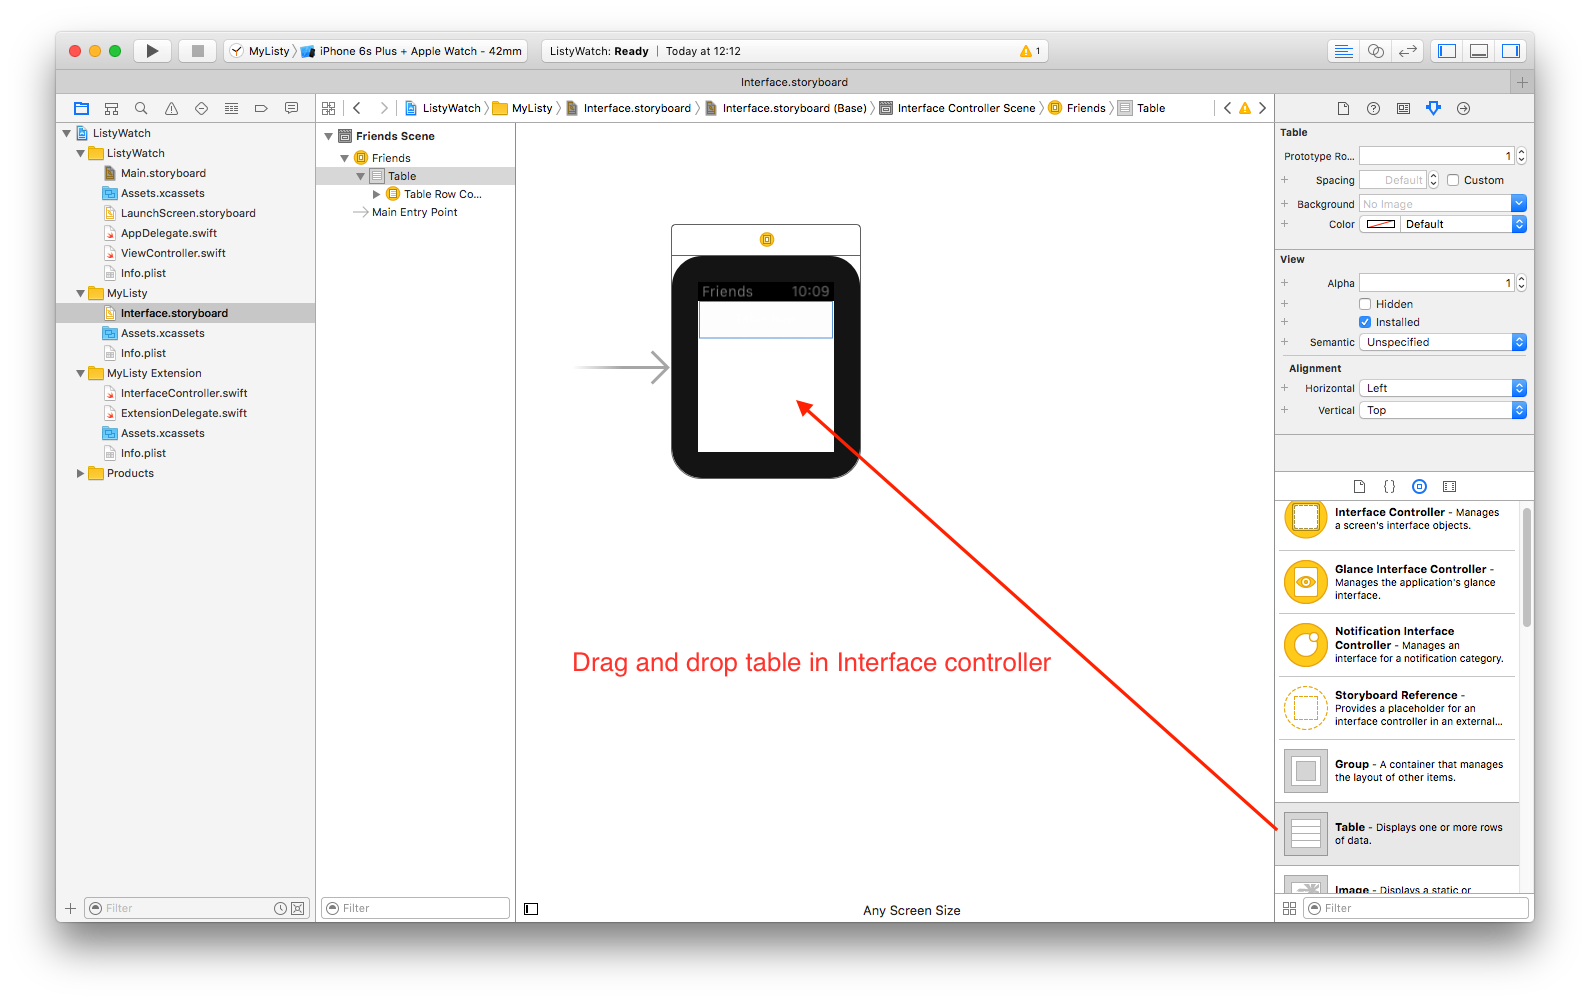
Step 10 : Now drag and drop the Table from the object library to WKInterfaceController.

Step 11 : Open Assistant Editor > Select Table from Document outline > Drag and Drop to InterfaceController.swift file to create Outlet . On the right side in Attribute inspector you can set table's property.


Step 13 : Drag and Drop label in group of row controller. Create outlet in row class. You can set property of label from Attribute inspector.

Step 14 : Select RowController from Document outline then select Attribute inspector. Now give a name in identifier. This name will be useful for reuse of row in table.

Step 15 : I have created simple string Array to Show name in watch.

Step 16 : To run Watch App, select scheme for Watch App and then select simulator. (Just like below image)

Step 17 : The Watch App Output is :

Download Demo of WatchKit.
Thanks.

This tutorial useful to learn how to create simple table in Watch App, layout the app UI and how to run Watch App.
Follow simple steps to develop Watch App.
Step 1 : Open the Xcode , Select create new project and After selecting, enter the product name as "ListyWatch". Organization name "GuruSoft" and Organization identifier "com.gurusoft", Then press the next and create the new project.
Step 3 : Now go to Xcode > File > New > Target. (As shown in below image.)
Step 4 : Select "Application" in "WatchOS" section. Then click on WatchKit app. and press Next button.
Step 5 : Give the name of your watch App "MyListly", also uncheck three checkbox if Checked. because we are not going for this now.
1. Include Notification scene.
2. Include Glance scene.
3. Include complication.
Step 6 : Now you have successfully added "Watch Kit app" and "Watch Kit Extension" to your project. Here you can see two new Groups were created in File inspector. Named "MyListly" and "MyListly Extension". There are also two new targets added with main iPhone app.
In WatchKit App, You have three files. In those one is Interface.storyboard which is helpful to design and navigation flow for different watches (There are two sizes of watch : 38mm and 42mm).
Step 7 : In WatchKit Extension you have four built in files.
1. InterfaceController.swift for controller like ViewController in iOS.
2. ExtensionDelegate.swift like AppDelegate in iOS.
1. InterfaceController.swift for controller like ViewController in iOS.
2. ExtensionDelegate.swift like AppDelegate in iOS.
Step 10 : Now drag and drop the Table from the object library to WKInterfaceController.
Step 11 : Open Assistant Editor > Select Table from Document outline > Drag and Drop to InterfaceController.swift file to create Outlet . On the right side in Attribute inspector you can set table's property.
Step 12 : Now create class for table's row named "FriendTableCell" (As we are creating UITableViewCell's custom class). Here Parent class must be NSObject type. Then select Row Controller from Document outline. And in identity Inspector assign a new class name to row controller.
/**** TABLE ROW CUSTOM CLASS  ****/

class FriendTableCell : NSObject {

}
Step 13 : Drag and Drop label in group of row controller. Create outlet in row class. You can set property of label from Attribute inspector.
/**** TABLE ROW CUSTOM CLASS  ****/

class FriendTableCell : NSObject {
    @IBOutlet var labelFriendName: WKInterfaceLabel!
}
Step 14 : Select RowController from Document outline then select Attribute inspector. Now give a name in identifier. This name will be useful for reuse of row in table.
Step 15 : I have created simple string Array to Show name in watch.
let arrFriendList = ["Guruprasad", "Harry", "Duke", "Kothmir"]func loadTableData() {
// How many rows in table
tableVwFriends.setNumberOfRows(arrFriendList.count, withRowType: "FriendTableCell")
// Generate table rows and set label texts.
for (nameIndex, name) in arrFriendList.enumerate() {
let row = tableVwFriends.rowControllerAtIndex(nameIndex) as! FriendTableCell
row.labelFriendName.setText(name)
}
}Step 16 : To run Watch App, select scheme for Watch App and then select simulator. (Just like below image)
Step 17 : The Watch App Output is :
Download Demo of WatchKit.
Thanks.
Build a simple Apple Watch App in Swift.
 Reviewed by KIRIT MODI
on
23:59:00
Rating:
Reviewed by KIRIT MODI
on
23:59:00
Rating:
Reviewed by KIRIT MODI
on
23:59:00
Rating:


No comments: